Build a Sidebar Menu with React, Typescript and Styled Components

Introduction
In this tutorial, we are going to learn how to create a basic sidebar menu (which is one approach to displaying navigation to users) using React with typescript to build the interface and styled-components for styling purposes.
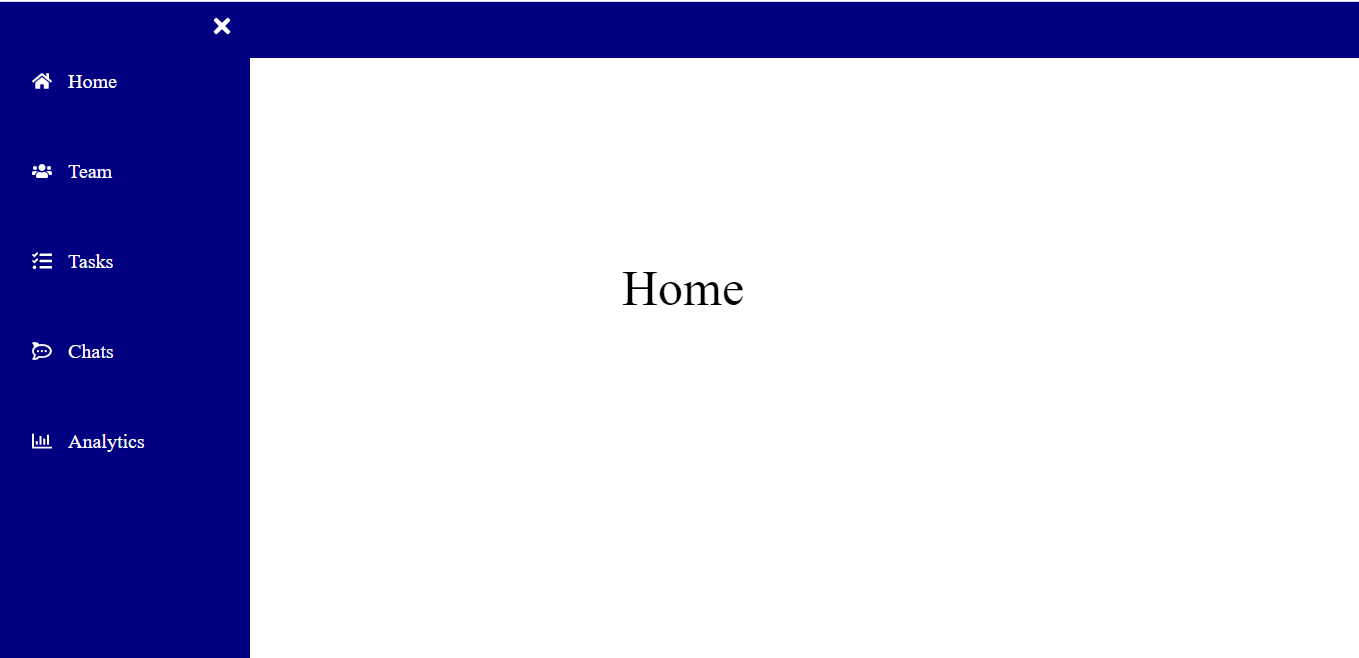
Once we are done building, our sidebar menu should look like this;
Technologies
- React alongside typescript
- Styled components
- React icons
- Yarn package manager
Prerequisites
Basic knowledge of how; react-router, useState hook, typescript and styled-components works will aid the smooth understanding of this tutorial.
Step 1: Setup the Project
To set up the project, we'll use create-react-app and the --template typescript flag. Open up your terminal and then run the following command;
yarn create react-app react-sidebar --template typescript
Change directory into the project folder by running;
cd react-sidebar
To open this project in your code editor right from the terminal, type code .
Then, start the development server directly from the code editor terminal by running;
yarn start
Step 2: Install Project Dependencies
To successfully build out the sidebar navigation menu, we'll need to install these dependencies; react-router, styled-components and react-icons alongside their type definitions. Now, execute the following commands;
yarn add react-router-dom @types/react-router-dom styled-components @types/styled-components react-icons @types/react-icons
Step 3: Scaffolding out our App
For this application, we'll need to create about 5 pages as shown in the image above and 2 components of which one will be the sidebar itself and the other containing the sidebar data.
First of, let's create a folder named components in the src folder of our application. Right in this folder, create the SidebarData.tsx file and update it as shown below;
import React from 'react'
import * as FaIcons from 'react-icons/fa'

export const SidebarData = [
    {
        title: 'Home',
        path: '/',
        icon: <FaIcons.FaHome />
    },
    {
        title: 'Team',
        path: '/team',
        icon: <FaIcons.FaUsers />
    },
    {
        title: 'Tasks',
        path: '/tasks',
        icon: <FaIcons.FaTasks />
    },
    {
        title: 'Chats',
        path: '/chats',
        icon: <FaIcons.FaRocketchat />
    },
    {
        title: 'Analytics',
        path: '/analytics',
        icon: <FaIcons.FaRegChartBar />
    }
]
From the code above, we basically imported icons from the react-icon library installed and then created our data as javascript objects. These data will allow us to dynamically set our hyperlinks and display the title and icons for each page in the sidebar component.
Now, to build out our sidebar component, create another file called Sidebar.tsx in the components folder.
Then, let's create the top navbar component which will wrap our menu bar icon;
import React from 'react'
import { Link } from 'react-router-dom'

import * as FaIcons from 'react-icons/fa'

const Sidebar: React.FunctionComponent = () => {
    return (
        <>
            <Navbar>
                <MenuIconOpen to="#">
                    <FaIcons.FaBars />
                </MenuIconOpen>
            </Navbar>
       </>
   )
}
export default Sidebar
Next, update the App.tsx file by importing the sidebar component so we can have a view of what it is like;
import React from 'react'

import Sidebar from './components/Sidebar'

const App: React.FunctionComponent = () => {
  return (
    <>
        <Sidebar />
    </>
  )
}

export default App
In the Sidebar.tsx, let's create the contents for the sidebar navigation. Here, we'll import our sidebar data and then map through. Also, we'll create a sidebar component that will wrap the close icon and sidebar data. Update your code as shown below;
import React from 'react'
import { Link } from 'react-router-dom'

import * as FaIcons from 'react-icons/fa'

import { SidebarData } from './SidebarData'

const Sidebar: React.FunctionComponent = () => {

    return (
        <>
            <Navbar>
                <MenuIconOpen to="#">
                    <FaIcons.FaBars />
                </MenuIconOpen>
            </Navbar>

            <SidebarMenu>
                <MenuIconClose to="#">
                    <FaIcons.FaTimes />
                </MenuIconClose>

                {SidebarData.map((item, index) => {
                    return (
                        <MenuItems key={index}>
                            <MenuItemLinks to={item.path}>
                                {item.icon}
                                <span style={{marginLeft: '16px'}}>{item.title}</span>
                            </MenuItemLinks>
                        </MenuItems>
                    )
                })}
            </SidebarMenu>
        </>
    )
}

export default Sidebar
Step 4: Add Styles with styled-components
Still in the Sidebar.tsx file, let's add the following so we can style each component created;
import styled from 'styled-components'

const Navbar = styled.div`
    display: flex;
    justify-content: start;
    align-items: center;
    height: 3.5rem;
    background-color: #000080;
`

const MenuIconOpen = styled(Link)`
    display: flex;
    justify-content: start;
    font-size: 1.5rem;
    margin-left: 2rem;
    color: #ffffff;
`

const MenuIconClose = styled(Link)`
    display: flex;
    justify-content: end;
    font-size: 1.5rem;
    margin-top: 0.75rem;
    margin-right: 1rem;
    color: #ffffff;
`

const SidebarMenu = styled.div<{close: boolean}>`
    width: 250px;
    height: 100vh;
    background-color: #000080;
    position: fixed;
    top: 0;
    left: ${({ close}) => close ? '0' : '-100%'};
    transition: .6s;
`

const MenuItems = styled.li`
    list-style: none;
    display: flex;
    align-items: center;
    justify-content: start;
    width: 100%;
    height: 90px;
    padding: 1rem 0 1.25rem;
`

const MenuItemLinks = styled(Link)`
    display: flex;
    align-items: center;
    padding: 0 2rem;
    font-size: 20px;
    text-decoration: none;
    color: #ffffff;

    &:hover {
        background-color: #ffffff;
        color: #000080;
        width: 100%;
        height: 45px;
        text-align: center;
        border-radius: 5px;
        margin: 0 2rem;
    }
`
Notice that the close prop which was added to the SidebarMenu above has a type definition of boolean. Now, we'll need to pass down this prop in the main component itself like so;
<SidebarMenu close={close}>
                <MenuIconClose to="#">
                    <FaIcons.FaTimes />
                </MenuIconClose>

                {SidebarData.map((item, index) => {
                    return (
                        <MenuItems key={index}>
                            <MenuItemLinks to={item.path}>
                                {item.icon}
                                <span style={{marginLeft: '16px'}}>{item.title}</span>
                            </MenuItemLinks>
                        </MenuItems>
                    )
                })}
            </SidebarMenu>
Step 5: Set State for the Sidebar
In the Sidebar.tsx file let's set the state and also create a function that will handle the opening and closing of the sidebar when the icons are clicked upon;
import { useState } from 'react'

const Sidebar: React.FunctionComponent = () => {
    const [close, setClose] = useState(false)
    const showSidebar = () => setClose(!close)
    return (
        <>
            <Navbar>
                <MenuIconOpen to="#" onClick={showSidebar}>
                    <FaIcons.FaBars />
                </MenuIconOpen>
            </Navbar>

            <SidebarMenu close={close}>
                <MenuIconClose to="#" onClick={showSidebar}>
                    <FaIcons.FaTimes />
                </MenuIconClose>

                {SidebarData.map((item, index) => {
                    return (
                        <MenuItems key={index}>
                            <MenuItemLinks to={item.path}>
                                {item.icon}
                                <span style={{marginLeft: '16px'}}>{item.title}</span>
                            </MenuItemLinks>
                        </MenuItems>
                    )
                })}
            </SidebarMenu>
        </>
    )
}

export default Sidebar
Step 6: Create Pages
In the src folder of our app, create a folder named pages. Now, in this folder create 5 separate files named; Home.tsx, Team.tsx, Tasks.tsx, Chats.tsx and Analytics.tsx.
Then, update each file as shown below;
import React from 'react'
import styled from 'styled-components

const HomeText = styled.div`
    display: flex;
    align-items: center;
    justify-content: center;
    font-size: 50px;
    height: 70vh;
`

const Home: React.FunctionComponent = () => {
    return (
        <HomeText>Home</HomeText>
    )
}

export default Home
import React from 'react'
import styled from 'styled-components'

const TeamText = styled.div`
    display: flex;
    align-items: center;
    justify-content: center;
    font-size: 50px;
    height: 70vh;
`

const Team: React.FunctionComponent = () => {
    return (
        <TeamText>Team</TeamText>
    )
}

export default Team
import React from 'react'
import styled from 'styled-components'

const TaskText = styled.div`
    display: flex;
    align-items: center;
    justify-content: center;
    font-size: 50px;
    height: 70vh;
`

const Tasks: React.FunctionComponent = () => {
    return (
        <TaskText>Tasks</TaskText>
    )
}

export default Tasks
import React from 'react'
import styled from 'styled-components'

const ChatText = styled.div`
    display: flex;
    align-items: center;
    justify-content: center;
    font-size: 50px;
    height: 70vh;
`


const Chats: React.FunctionComponent = () => {
    return (
        <ChatText>Chats</ChatText>
    )
}

export default Chats
import React from 'react'
import styled from 'styled-components'

const AnalyticsText = styled.div`
    display: flex;
    align-items: center;
    justify-content: center;
    font-size: 50px;
    height: 70vh;
`

const Analytics: React.FunctionComponent = () => {
    return (
        <AnalyticsText>Analytics</AnalyticsText>
    )
}

export default Analytics
Step 7: Create Routes
Let's create routes for our pages. Open up the App.tsx file and update it like so;
import React from 'react'
import { BrowserRouter as Router, Routes, Route } from "react-router-dom";

import Sidebar from './components/Sidebar'

import Home from './pages/Home';
import Team from './pages/Team';
import Tasks from './pages/Tasks';
import Chats from './pages/Chats';
import Analytics from './pages/Analytics';


const App: React.FunctionComponent = () => {
  return (
    <>
      <Router>
        <Sidebar />
        <Routes>
          <Route path='/' element={<Home />} />
          <Route path='/team' element={<Team />} />
          <Route path='/tasks' element={<Tasks />} />
          <Route path='/chats' element={<Chats />} />
          <Route path='/analytics' element={<Analytics />} />
        </Routes>
      </Router>
    </>
  )
}

export default App
Note: In react-router-rom v6
Switchwas replaced withRoutesandcomponentswas replaced withelements. To learn more check out this docs
Step 8: Add Global Styles
Global styles are styles used by all elements of a page and are sometimes added to override browser default styles.
Now, in thesrc folder, create a
folder named styles. Then, create a global.ts file in the styles folder and update as shown below;
import { createGlobalStyle } from "styled-components";

export const GlobalStyle = createGlobalStyle`
    * {
        box-sizing: border-box;
        margin: 0;
        padding: 0;
        font-family: 'Open Sans', sans-serif;
    }
`
Next, open your index.tsx file and import the GlobalStyle like so;
import React from 'react';
import ReactDOM from 'react-dom';
import './index.css';
import { GlobalStyle }  from './styles/global';
import App from './App';

ReactDOM.render(
  <React.StrictMode>
    <GlobalStyle />
    <App />
  </React.StrictMode>,
  document.getElementById('root')
);
Yaay! we have successfully built out our sidebar menu.
Conclusion
In this tutorial, we learnt how to build a basic sidebar navigation menu with React, typescript and styled-components.
You can check out the complete source code here.


